Are you feeling overwhelmed by the amount of storage being used on your scratch disk in Photoshop?
Are you constantly reminded of how much space is being taken up, but don’t know how to go about freeing up the disk? You’re not alone. Many Photoshop users have the same issue and find it difficult to know where to start.
Fortunately, it is not difficult to empty your scratch disk in Photoshop. By following a few simple steps, you can quickly have the disk cleared and free up valuable storage space. With this guide, you will learn how to empty your scratch disk in Photoshop and free up valuable space.
What is a scratch disk?
Scratch disks are the temporary storage space on your hard drive where programs like Photoshop can temporarily save work in progress. They require access to memory, or temporary storage, in order to function. Scratch disks allow the software to quickly access files they need by storing temporary files and backups.
Having Photoshop use a scratch disk instead of RAM for temporary storage improves performance. Scratch disks store previous versions of your projects, making them useful in the event of a Photoshop or operating system crash.
Scratch disk types
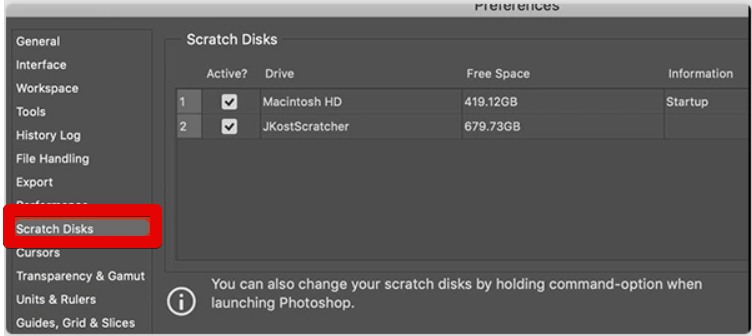
You can improve performance by assigning each scratch disk type to a different disk, but you can also use the same disk and just designate different folders. The following scratch disk options can be adjusted by going to Edit > Preferences > Scratch Disks / Adobe Premiere Elements 13 > Preferences > Scratch Disks.
Captured Video: Videos recorded with the capture panel will be saved in this directory.
Captured Audio: The folder or disk where your captured audio files will be stored after being recorded using the Capture panel.
Video previews: The place where you keep your video previews on a disk or folder. When you export to a movie file or a DV device from the Timeline, or select Timeline > Render Work Area, these files are generated. If an effect is used in the area being previewed, it will be rendered at full quality in the preview file.
Audio previews: A directory or disk dedicated to audio previews. When you go to the Timeline menu and select the Render Work Area option, the corresponding files will be generated. When exporting to a video file or DV device using the menu option Clip > Audio Options > Render And Replace, the same thing happens. If an effect is present in the area being previewed, it will be rendered in high quality in the preview file.
Media cache: The folder or disk that stores the audio peak files, audio conform files, video index files, and any other files that Premiere Elements generates to speed up the process of reading media files.
DVD encoding: A DVD Encoding folder or disk is where your encoded video and audio files will be stored once your DVD has been created.
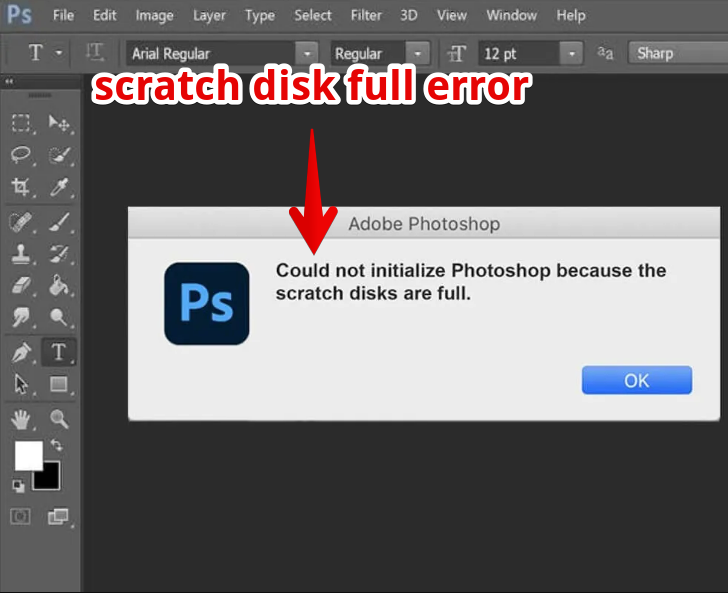
The “scratch disk full” error – what does it mean?
Photoshop crashes with a “scratch disk full” error when its temporary files and cache become too large. When all the space on your hard drive designated as Photoshop’s scratch disk has been used, Photoshop will notify you that the disk is full.
Could not initialize Photoshop because the scratch disks are full” is a message that may appear if your hard drive is already at capacity when you try to launch Photoshop.
The reason for this is minor and temporary (and often useless) files left over from previous projects. Photoshop will save these files automatically as you work, but once you’re done with a project, you can delete them.
The “scratch disk full” error may also be caused by insufficient storage space on the hard drive. If you don’t have enough free space on your hard drive, you may encounter a “scratch disk” error. Scratch disk space needs to be monitored on a regular basis on a Mac.
How to empty scratch disk in Photoshop
There are a few ways to empty your scratch disk in Photoshop:
- Choose File > Empty Trash.
- Choose Window > Empty Recycle Bin.
- Choose Edit > Empty Recycle Bin.
- Choose Window > Preferences > General > Delete Files When Closing Photoshop.
- Choose File > Save As. to save your file on your hard drive.
Or, in order to fix the scratch disk is full error in Photoshop, do the following in the order given:
- Reduce data usage. Make some room on the hard drive that you’ve designated as the scratch disk in Photoshop’s preferences, whether it’s a Mac or Windows computer. A free space analyzer tool, such as Disk Cleanup, will yield the best results.
- It’s time to get rid of Photoshop’s temporary files. Photoshop temporary files can be safely deleted in order to make room on the scratch disk. On Windows, Photoshop temporary files are saved as PST####.tmp, while on Mac they are saved as Temp####.

- Disk defragmentation is a must. Even if there is plenty of room on the scratch disk drive, the scratch disk is full error may still appear. This is because Adobe Photoshop needs a large amount of free, non-fragmented space on the scratch disk. Scratch disk drive shows plenty of free space, but you still get the error message. Try a disk defragmentation utility.
- In order to reset Photoshop, the cache must be deleted. If Photoshop launches, select File > Edit > Purge > All (on Windows) or Photoshop > Edit > Purge > All (in Photoshop CC) (on Mac).
- Return defaults to the Crop tool. When cropping an image in Photoshop, the error may appear if the values in the Crop tool’s options bar are in the incorrect units. For instance, if you try to create a file with dimensions of 1200×1600 when the units are set to inches rather than pixels, you will end up with a very large file that may cause the scratch disk is full message to appear. Click Clear in the toolbar’s alternatives menu after picking the Crop tool to get rid of this issue.
- Improve Photoshop’s efficiency by adjusting the settings. To raise the limit of RAM that Photoshop can use, open the program, navigate to Edit > Preferences > Performance (on Windows) or Photoshop CC > Preferences > Performance (on Mac), and then move the sliders under Memory Usage.
- Swap out the scratch disks or put in some extra ones. A separate hard drive partition should be made if at all possible to use as a Photoshop temporary storage area. Photoshop can still be used with just one scratch disk on the system partition, but performance will be greatly enhanced if you make the scratch disk the system’s fastest drive.
- From Photoshop’s Preferences menu, you can move or create new scratch disks. Select Edit > Preferences > Scratch Disks (or hit Ctrl+Alt on Windows) to enable scratch disks. To access the Scratch Disks preferences in Photoshop CC for macOS, choose Preferences > Scratch Disks from the main menu or use the shortcut Command+Option.
Conclusion
For creative professionals, Photoshop is a must-have tool. To avoid the worst-case scenarios, it’s crucial that you properly manage your available memory. That shouldn’t be an issue if you’ve taken our advice to heart. We wish you a lot of fun while you’re busy making awesome things.
Do you recall ever having a completely full scratch disk? What options did you find to be most helpful? Leave a comment and let us know what you think.