If you’re like me, you’ve probably found yourself in a situation where you need to make a Smart Object editable. Perhaps you need to change the dimensions of an image, or you need to add text to it. Luckily, making a Smart Object editable is easy! In this blog post, I’ll show you how to do it.
So whether you’re a beginner or an experienced Photoshop user, this tutorial is for you!
What is a smart object?
A smart object is a Photoshop feature that allows users to edit images non-destructively.
Smart objects preserve an image’s original quality and can be edited multiple times without degrading the image. They can be created from scratch or by converting existing layer groups, shape layers, text layers, or raster images.
Moreover, smart objects can be linked or embedded, and they support vector data and live filters. They are a powerful tool for managing complex compositions and for making global changes to an image.
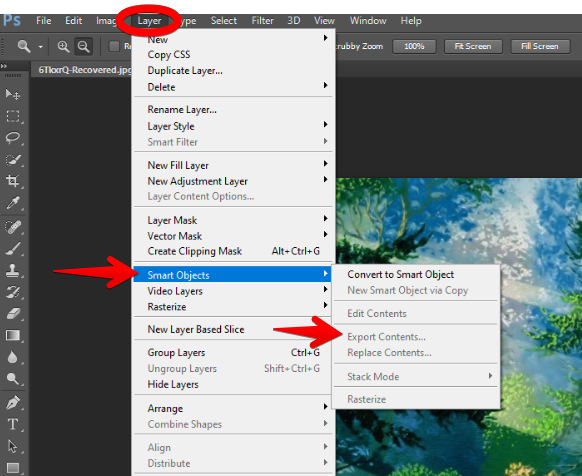
How to make a smart object editable in Photoshop
It’s easy to make a smart object editable in Photoshop- simply double-click on the smart object layer in the layers panel. This will open up the embedded image in a new window, and you can make your changes there. Remember to save your changes before closing the window, and they will be reflected in the main document.
Types of smart objects
There are two distinct kinds of smart objects in Photoshop: those that are embedded and those that are linked. From the moment you make them, you can choose which one you prefer, and you can always switch between them.
One prevalent variety is the embedded smart object. It’s identical in appearance and functionality to the original file, but it’s disconnected from it. This means that once it has been imported into Photoshop, the original file can be altered or deleted without affecting the Photoshop version. The inverse is also true: modifying the smart object in Photoshop will have no effect on the original file.
Unlike an embedded smart object, a linked object keeps its connection to the original file. What if you linked a colorful image to your new piece of art? Next, you’ll need to access the source file and convert it to monochrome.
When you return to your original artwork, the smart object you linked here will be grayscale instead of black and white, regardless of whether or not you made that change here. This is helpful for coordinating the use of linked smart objects across multiple files. If you make a change to the original file, all of the smart objects will refresh themselves immediately.
Benefits of using smart objects
Here are some of the benefits of Smart Objects:
- Make changes to an image without destroying it. No quality is lost during resizing, rotation, skewing, perspective distortion, etc.;
- Use filters that won’t harm the data;
- Images created in Adobe Illustrator or a similar program can be embedded directly into a webpage without first being converted to pixels.
- For images that you have multiple copies of, you can make changes to one and have them reflected in all of them immediately.
- Make filter adjustments more flexible by allowing for individual masks. A Smart Object layer’s pixels are inaccessible to direct manipulation. Some common editing techniques, such as painting, dodging and burning, and cloning, cannot be applied directly to a Smart Object. For many photographers, this is a dealbreaker and puts them off using Smart Objects altogether. But by double-clicking on the layer, Smart Objects can be edited in place. Clicking this button launches the Smart Object in its own window, where you can make changes. You can also duplicate the Smart Object and then paste it onto a higher layer. Both methods help facilitate a non-destructive process.
Could not complete your request because the smart object is not directly editable (How to fix)
If you try to modify the pixel data directly, you will likely encounter this error. Essentially, you can’t clone, dodge, or paint directly on a Smart layer. Several solutions exist, which is good news.
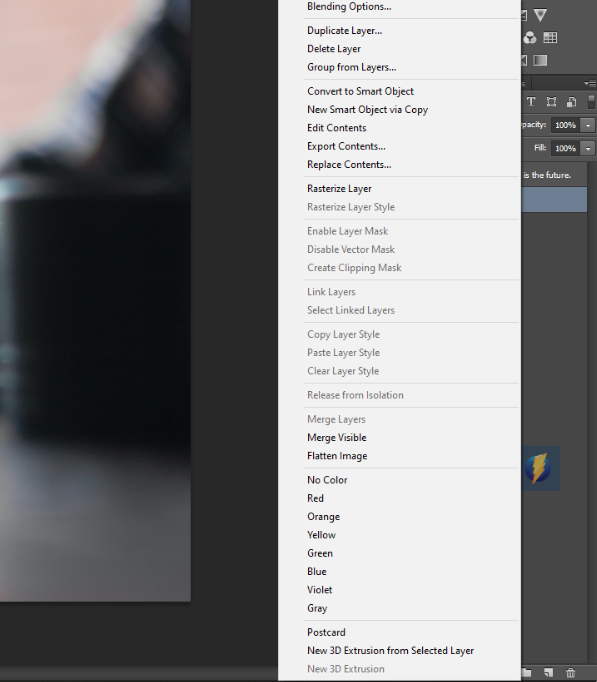
One option is to make a new layer and edit that. This way, you can make changes to the smart object, like a brushstroke, without having to rasterize it. In any case, if you insist on making direct changes to the Smart Object, you’ll need to rasterize it to make it into a standard layer first.
The Smart Object layer can be rasterized by right-clicking on it and selecting Rasterize Layer.
How can you use smart objects to streamline your workflow and improve your productivity in Photoshop?
Smart Objects allow you to make changes like resizing, rotating, distorting, warping, and perspective transformations without permanently altering the original file. Rather than modifying the layers themselves, you end up modifying the “container” that the smart object has placed them in. You can now simultaneously edit multiple layers without sacrificing quality while improving your editing productivity.
Conclusion
Editing smart objects in Photoshop is a great way to get more control over your images. By following the steps above, you can easily make any smart object editable. This technique is especially useful when you need to make changes to multiple smart objects at once.
So next time you’re working with smart objects in Photoshop, remember that you can always make them editable if you need to!