There are two excellent options in Photoshop if you need to eliminate an entire color.
Working with color can be quicker than the process of making a complex selection around your subject. A precise selection that completely removes a chosen color range can be made only with a few clicks. What you’re about to read is a comprehensive guide on achieving that very goal.
Let’s start!
All about colors
If you understand the process of color creation and how different colors interact, you’ll be able to use Photoshop more efficiently. Having a firm grasp on fundamental color theory will help you consistently achieve your desired effects rather than winging them.
Primary colors
When combined in various ways, the additive primaries (red, green, and blue) produce the full range of colors that the human eye can see. Light of different colors can be combined to create others, starting with white.
These pigments, known as subtractive primaries, can be mixed to produce an infinite number of colors. In order to create colors, printers mix pigments of four primary colors (cyan, magenta, yellow, and black) instead of using additive mixing as monitors do. Subtractive refers to the process by which two or more primary colors are combined to create a new color whose purity is reduced from that of the original primaries.
The color wheel
When first learning how to balance colors, it’s helpful to have a diagram of the standard color wheel on hand. The color wheel can help you visualize how a shift in one color value will affect the others, as well as how that shift will be conveyed when switching between the RGB and CMYK color spaces.
If you want to reduce the amount of red in an image, for instance, you could increase the amount of green. In a color wheel, two colors that are opposite one another are said to be complementary. Similarly, fine-tuning the two colors next to it on the wheel, or the two colors next to its opposite, will increase or decrease the intensity of the original color.
Both reducing the amount of magenta and increasing its complement, green, will reduce the amount of magenta in a CMYK image. To reduce magenta in an RGB image, you can either remove red and blue or increase green. As a whole, the colors are now more harmonious with less magenta.
How to remove color in Photoshop
There are a few different ways that you can remove colors in Photoshop. In this section, we’ll show you the three most common options on how to do it.
Color range tool
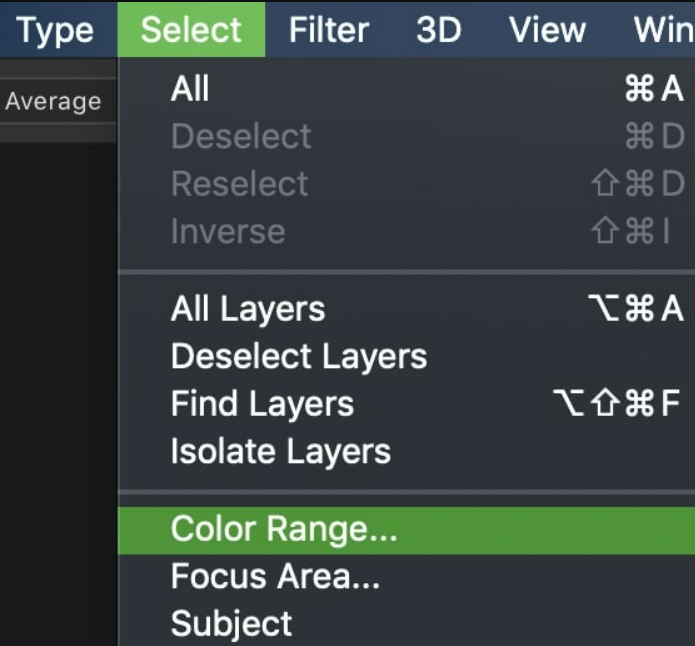
One way is to go to Select and then find the Color range. Using it, you can isolate a specific color range within an image for further editing. It only takes a few clicks to replace or delete your selection after you’ve defined it.
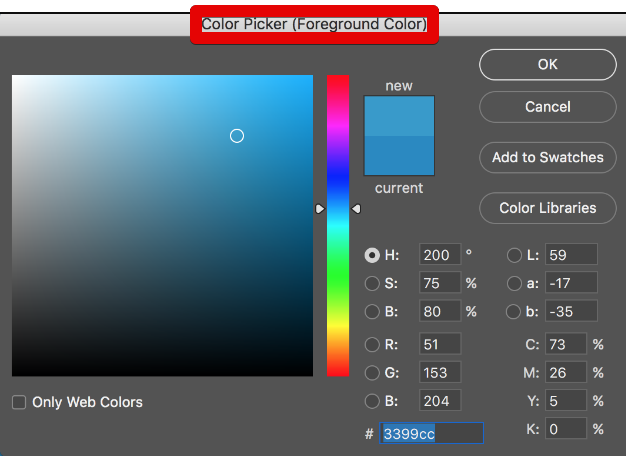
Once you’ve got your image, it’s a good idea to make a copy of the layer so you can undo any accidental changes. Furthermore, you can pick the color by zooming in on the relevant areas of the image.
Eraser tool
Another way to remove colors is to use the eraser tool. To remove color using the eraser tool, first select the eraser tool from the toolbar. To remove a specific color range from an image, use the “Magic Eraser.” It works best on images where a clear color boundary exists.
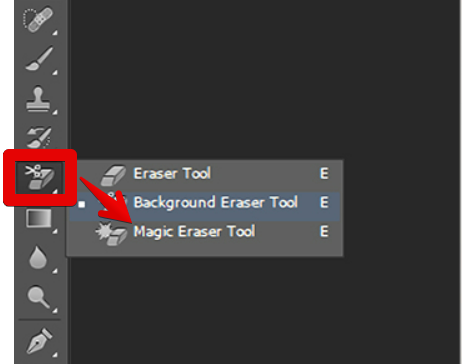
When the picture is open in Photoshop, select the Magic Eraser Tool from the menu. Tolerance level 30 should be selected from the top tool settings. Select the unwanted hue from the panel on the right.
Now, click the parts of the image where you see the color. You can quickly fix your image by erasing that unwanted color spectrum.
Paint bucket tool
Finally, you can use the paint bucket tool to fill in the area with the color that you want to remove. To remove color using the paint bucket tool, first select the paint bucket tool from the toolbar. Then, click on the area you want to fill with another color.
A dialog box will appear asking you which color you want to use. Select the color that you want to use and then click “OK”. The area will be filled with that color.
How to replace deleted color in Photoshop
Now that you have successfully deleted that color from your design, you may want to replace it with another color. The first thing to do is to make a new layer and paint it in the new color. If you’ve succeeded in eliminating the entire color range you chose, the new color should appear without any irregularities.
When a color is removed, it’s possible that large areas of black or white will appear partially see-through. This is not evidence of a serious error on your part, and it is very simple to correct.
- To create a new layer beneath the translucent regions, select the color range and then press Ctrl + Shift + I (Command + Shift + I on a Mac).
- Press Ctrl + Shift + E (Command + Shift + E on a Mac) to merge layers, then fill the layer with the color of the object that lost its transparency. Having done so, you can resume editing the image as usual.
Conclusion
Removing colors in Photoshop is a simple process that can be accomplished in a few different ways. Using the color picker tool, eraser tool, or paint bucket tool is an effective method for removing colors.