If you’re like me, you probably have a lot of folders full of images on your computer. And if you’re like me, you probably have a lot of those images in Adobe Photoshop.
But what if you want to change something about one of those images What if you want to move it to a different folder, or what if you want to delete it?
In order to do any of those things, you first have to unlock the index file. The index file is what tells Photoshop where all of the images are stored on your computer. Without it, Photoshop wouldn’t be able to find any of the images.
Fortunately, unlocking the index file is a pretty simple process. In this article, we’ll guide you on how to do it.
How to unlock the index layer in Photoshop
In Photoshop, the index is used to create index-linked layers. This means that you can link a layer to an index so that it will change when the index is updated. For example, you might want to link a layer to an index of colors so that the colors in the layer will change when the index is updated.
To unlock the index, simply follow these steps:
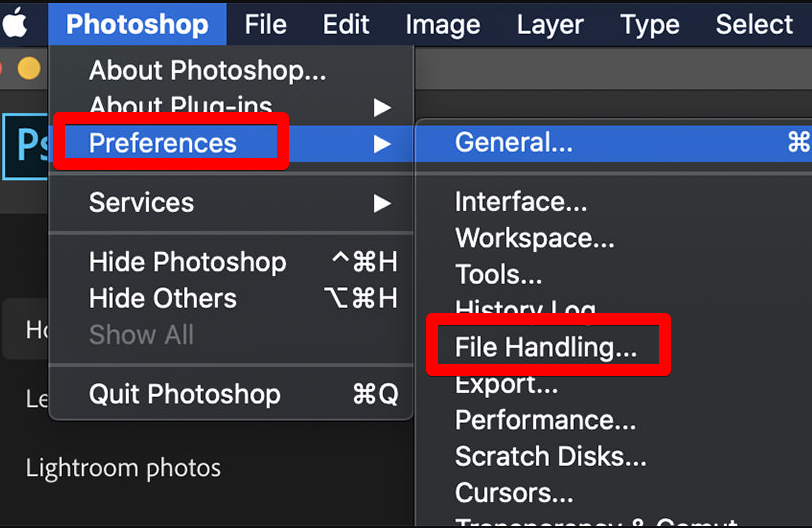
1. First, open Adobe Photoshop. Then, go to the “Edit” menu and select “Preferences.” A new window will pop up.
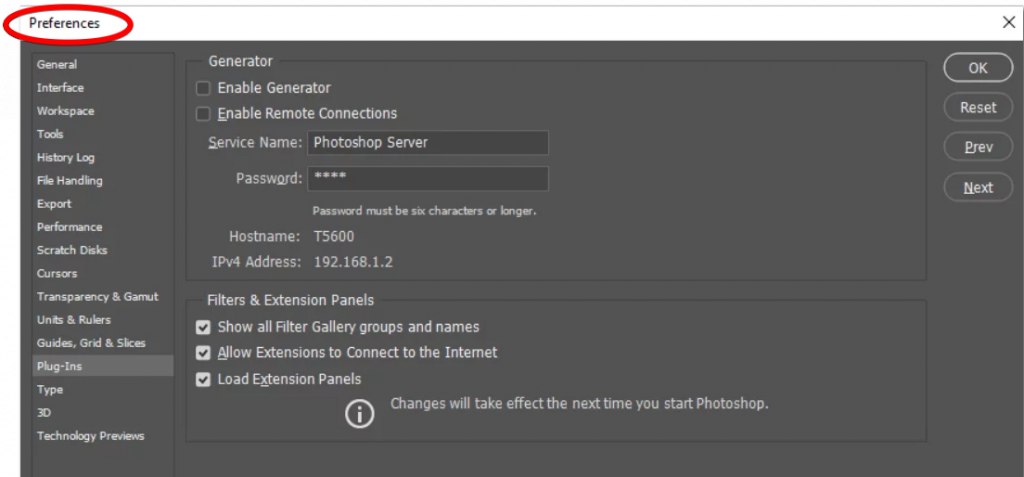
2. In that window, select “File Handling” from the left-hand menu. Near the bottom of the window, there will be a checkbox that says “Lock Index Files.” Make sure that box is unchecked.
3. Click “OK” to close the Preferences window. Now, go back to the folder full of images that you want to modify.
4. Right-click on one of the images and select “Open With.” A new window will pop up with a list of programs. Select Adobe Photoshop from that list.
5. The image should now open in Photoshop. From here, you can make whatever changes you want to make. When you’re finished, just save the image and close Photoshop.
Types of layer locks
In order to make more precise edits, you can lock certain aspects of layers. You’ll find these controls above the layer list, to the right of “Lock:” Pick a layer (or layers), then choose a locking method.
- A checkerboard represents the option to lock transparent pixels. This prevents you from accidentally modifying the layer beneath by accidentally editing a transparent area.
- Pixel Locking: The tool’s icon is a paintbrush. Only the areas of the layer that are not transparent can be changed.
- The lock pixel position icon is a cross with four interconnected dots. It allows you to continue painting, changing the color, and adding text, but prevents you from moving the layer.
Photoshop’s Unlocked and Locked Layers: Troubleshooting
If you’re new to Photoshop or have never played around with the locking and unlocking of layers, you may be surprised by the results. There are a variety of file formats, and Photoshop may not be able to open them all. It’s possible that different types of layers have varying purposes.
Issues with layer manipulation
In some cases, modifying a layer could prove to be challenging. It’s possible that no options are available in the Layers submenu of the main menu’s top bar. A layer’s color mode that is incompatible with Photoshop could be to blame for this problem; in most cases, this will be an Index Layer using Indexed Color.
To correct this, choose the layer, then head to Image > Mode. If you find Indexed Color selected, unchecking it and selecting RGB or another color mode will unlock the layer, renaming it Background with a Lock. Unlocking a layer is as simple as double-clicking it or selecting Layer > Layer from Background > New Layer > Specifying a Name and Filling in the Contents.
The layers panel’s capability to lock and unlock individual layers
Sometimes the Lock icon in the layers panel can be used to lock or unlock the layers. The other icons next to the padlock allow you to lock different parts of a layer selectively. Every layer has the option of locking two features.
Clicking the icons to lock or unlock layers does not always have the desired effect. When this happens, double-click the layer to bring up the layer menu, fill it in, and then click OK. There’s also a Layer > New > Layer from Background option.
You can also press Ctrl + J or right-click the layer and select Duplicate Layer. Follow these directions to unlock the layer.
If the icons in the Layers panel aren’t helping you lock a layer, you can make it into a locked background by selecting Layers > New > Background from Layer. Keep in mind that it could be a Partial Lock where only certain features are disabled or a Full Lock where all features are disabled.
The padlock icon in the layers palette can be used to lock and unlock a layer again. Aside from the layers themselves, the layer palette also includes a number of buttons. When you click the padlock icon, the layer you have selected will be locked. It’s also the key to opening it.
However, keep in mind that the background layer is always off-limits. By holding down the Control key while clicking on the layers you want to select, you can select multiple layers at once.
Conclusion
Luckily, unlocking the index file is a straightforward process. Now that you know how to do it, you can easily make changes to any of your images in Photoshop.
So go ahead and try it out the next time you need to move or delete an image. And if you ever have any questions, feel free to reach out to our team of experts. We’re always happy to help.