Cutting out images in Figma is a great way to make design edits faster and easier.
Whether you’re working with a vector image or an image with complex shapes, Figma can help you quickly cut out sections of the image. This not only simplifies the design process but also makes it easier for designers to collaborate on a project as a team.
What is Figma?
Figma is a powerful tool that enables digital creators to work efficiently and collaboratively. With Figma, users can create illustrations, designs, prototypes, and other digital creations quickly and easily. Through its intuitive interface and powerful features, Figma provides an all-in-one solution for design projects of all sizes.
Figma’s Editor is one of the platform’s most useful features – allowing users to collaborate in real-time on a project. Multiple people can work simultaneously, and changes are immediately visible to everyone. Figma also includes versioning so that users can have multiple iterations of their projects without sacrificing any quality or precision. Plus, powerful commenting features allow users to give and receive feedback on the current project.
What makes Figma powerful is that it is cloud-based and easy to access virtually anywhere, meaning you can stay connected no matter where you are.
It also provides an extensive library of shapes, icons, and plugins that allow users to customize their digital creations and version control, publishing options, and other helpful features to help streamline the design process.
Overall, Figma is an invaluable tool for digital creators that allows them to work quickly and collaboratively on projects of any size. With Figma’s intuitive interface and powerful features, users can create beautiful digital creations with ease.
Figma is an essential tool for any digital creator looking to make an impact with their work.
How to cut out part of an image in Figma
As someone who’s just getting started with Figma, you may be wondering how to cut out part of an image. Fortunately, it’s a relatively simple process that can be accomplished in just a few steps.
To begin, open the image you want to edit in Figma. Then, select the “Pen tool” from the toolbar at the top of the screen.
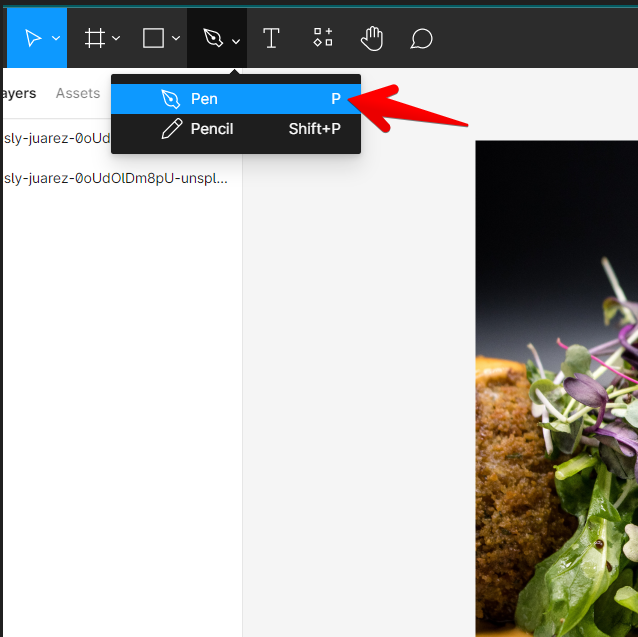
Next, click on the point where you want to start drawing your line. As you move your cursor, you’ll see a path being created. When you reach the point where you want to end your line, click again.
Now that you’ve created your path, it’s time to cut out the section of the image that lies within it. To do this, simply select the “Cut” option from the “Edit” menu at the top of the screen.
And that’s all there is to it! You’ve now successfully cut out part of an image in Figma.
An alternative method to cut parts of an image in Figma
Another way to cut a part of an image in Figma is through the use of the Slice tool.
To use the Slice tool, users will first need to select the area they want to cut out from the image. This can be done by either using the lasso tool or simply drawing around the area with their cursor. Once selected, users can then click on the little Slice icon that appears at the top of their screen, and their selection will be cut from the original image into its own separate shape.
By using this feature, designers are able to keep an organized workspace without having several copies of an image cluttering up their designs. It’s also helpful if multiple designers are working on different parts of an image since they can easily cut out specific sections of it and move them into separate layers.
This makes collaboration much simpler and more efficient when compared to other programs like Adobe Photoshop, which requires users to manually copy and paste each individual part into its own layer.
Aside from cutting images into separate shapes, Figma also allows users to use masks and effects to alter what gets sliced away from an image. By applying a mask over an existing section of an image, users can have more control over what gets cut out by making any areas outside of that mask invisible within Figma’s workspace.
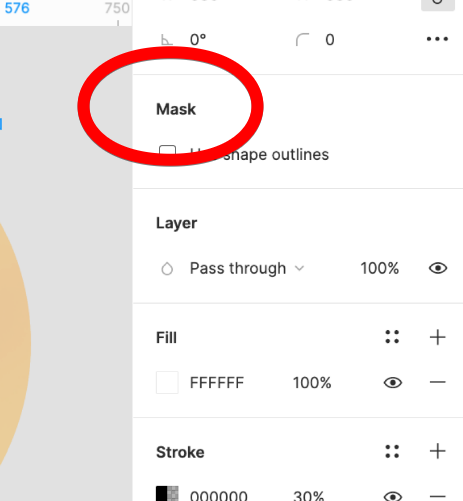
For example, if you only want certain parts of an image to remain visible after slicing, then you could place a mask over those parts, and everything outside of it would become hidden when you hit ‘Slice’.
Although this feature may seem quite simple in comparison to some other design tools available today, its power lies in how well it integrates with Figma’s other features, such as Shared Components and Teams Libraries.
Both aforementioned features allow teams to quickly access assets that have been pre-made by another designer via Linked Assets or even entire projects through Projects/Teams Setup Wizard, resulting in teams easily setting up collaborative workspaces with permission-based settings for maximum security and efficiency when collaborating on projects together as a team!
Conclusion
Overall, cutting images within Figma is a great way for designers who are looking for quick edits without compromising quality or data integrity while still retaining control over how their design looks in various stages throughout the process.
Not only does this save time, but it also helps keep workspaces organized for maximum efficiency when working together as part of a team!