Figma is a vector drawing and animation software. It is used by designers to create vector illustrations, logos, and icons.
Figma has a “Snap to Grid” feature that allows you to easily align objects to a grid.
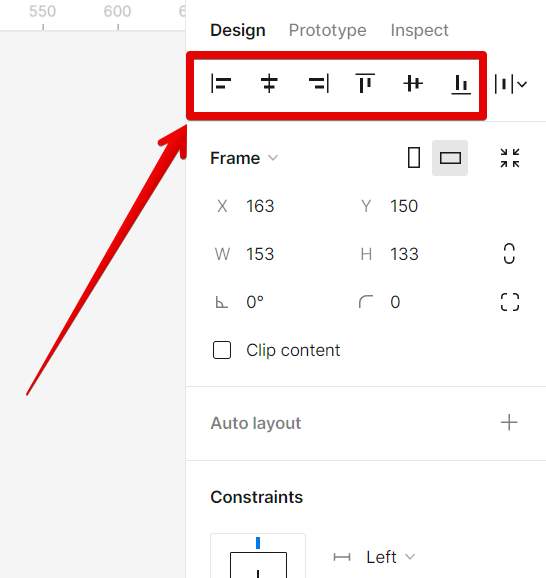
To snap to grid in Figma, first select the object or objects you want to align. Then, go to the Design tab and select one of the align options available at the top section. The selected object or objects will then snap to the nearest grid line. The options available to aid the alignment of your objects are the following with their corresponding keyboard shortcuts:
- Align left (Ctrl+A)
- Align horizontal centers (Alt+H)
- Align right (Alt+D)
- Align top (Alt+W)
- Align vertical center (Alt+V)
- Align bottom (Alt+S)
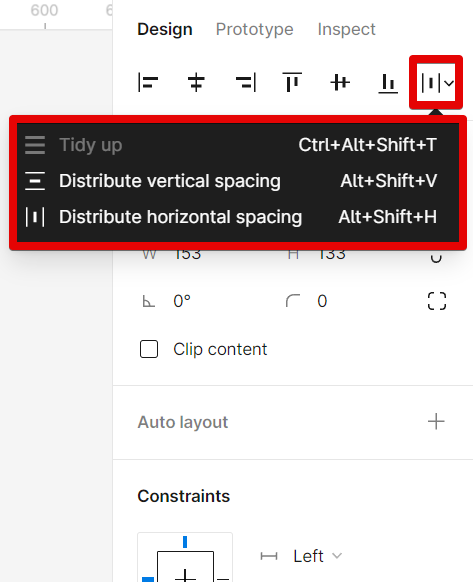
Additional options that you may want to try out to easily clean up the alignment of your objects are the following which can be found in the “More options” drop-down menu:
- Tidy up (Ctrl+Alt+Shift+T)
- Distribute vertical spacing (Alt+Shift+V)
- Distribute horizontal spacing (Alt+Shift+H)
PRO TIP: When snapping to grid in Figma, be aware that your objects will snap to the nearest grid line, which may not be where you want them. Be sure to check your objects’ positions before moving on.
Once you have snapped an object or objects to grid, you can move them around and they will automatically snap to the nearest grid line. This can be helpful when you are trying to create precise designs.
6 Related Question Answers Found
Enabling grid in Figma is a simple process that can be done in just a few steps. By enabling grid, you can make sure that your designs are aligned and organized in an efficient manner. Additionally, grid can help you to create more sophisticated and professional-looking designs.
Making a Grid in Figma
Making a grid in Figma is easy. First, open the Grid tool in the toolbox. Then, click on the grid icon in the toolbar.
Setting up a grid in Figma can be done in a few simple steps. First, click on the “Grids” tab in the toolbar and select the “Grid” button. This will open the Grid dialog box.
Grid systems are a fundamental part of web design. They help us to organize content on a page and create a consistent layout. But what if you want to create a grid in Figma?
There are a few different ways that you can make a grid on Figma. One way is to use the built-in grid tool. To do this, first select the frame that you want to add the grid to.
Grid in Figma is one of the most powerful and flexible tools available for web design. It enables you to quickly create responsive designs that look great on any screen size. Grid is made up of a series of vertical and horizontal lines that you can use to create your design.