When it comes to Photoshop, there are a lot of different ways that you can select colors. One way is to use the color picker tool. Another way is to use the eyedropper tool. And yet another way is to use the paint bucket tool.
But what if you want to select all of one color? How do you do that? This guide will help you how to do that exactly on Photoshop.
So keep reading!
Understanding colors in Photoshop
There are two color models available in Adobe Photoshop Elements. The HSB model is based on how the human visual system perceives color, while the YCbCr model is based on how computer monitors display color (in amounts of red, green, and blue or RGB). The color wheel is another useful tool for seeing how various hues relate to one another. Four different image modes (RGB, bitmap, grayscale, and indexed color) are available in Photoshop Elements for adjusting the color depth of a picture.
How to select all of one color in Photoshop
Color range tool
The easiest way to select all of one color in Photoshop is to use the color range tool. This tool can be found in the Select menu. To use it, simply click on the color that you want to select, and then click on the Select button. Photoshop will then select all pixels that are similar to the color that you clicked on. Here’s how to do it step-by-step:
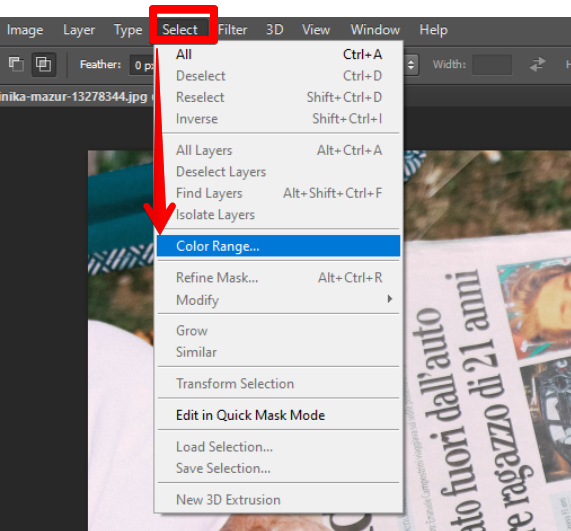
- Select > Color Range in Photoshop’s menu bar once the picture has been loaded.
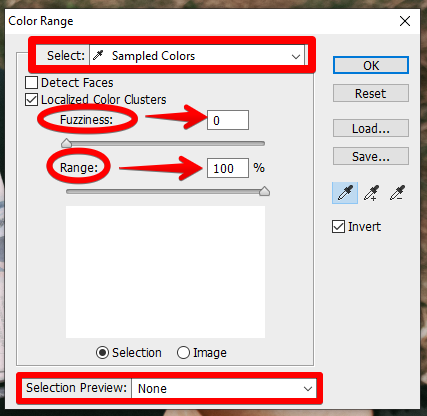
- Make sure the drop-down menu in Color Range reads Sampled Colors. Adjust Fuzziness to zero and increase Range to the maximum. Invert the selection by clicking the corresponding button, and turn off the Selection Preview.
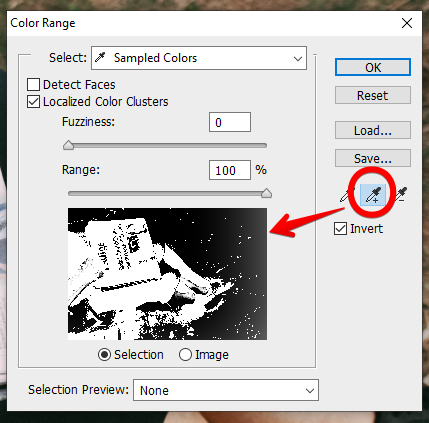
- If you want to use the Add to Sample function, you can do so by selecting the +Eyedropper icon. You can select all the cyan in the image by left-clicking the mouse and tracing around it. You can also go back and fill in any blanks by clicking on them. Everything in Black is available for your choosing.
- Next, let’s get rid of the black spots in every color besides cyan and blue. In order to use the Subtract from Sample tool, which looks like a -Eyedropper, for this purpose.
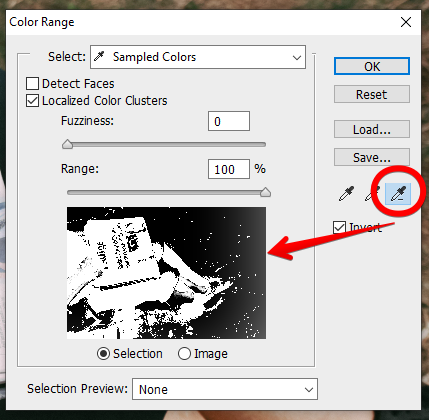
- To find the black spots that aren’t the color that you’ve select, left-click and hold the mouse, then drag it. Don’t forget to explore the content under the umbrella by clicking on our subjects. You’ve apparently decided that this particular list needs to be completely white. Once you’re ready, select the OK button.
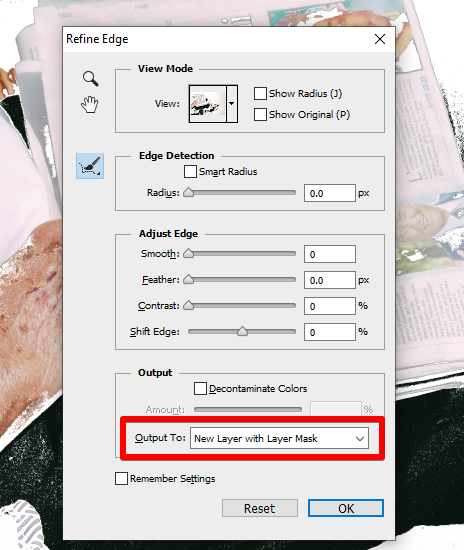
- The current selection has been highlighted for you. Select > Select and Mask is the next option.
- Make the adjustment under Output To Properties Layer New Layer with Mask. Once you’re ready, select the OK button.
Magic wand tool
You can also use the Magic Wand tool to select all of one color. To use this tool, simply click on the color that you want to select, and then click on the Select button.
Quick mask mode
If you want more control over which colors are selected, you can use the Quick Mask mode. To use this mode, simply click on the Quick Mask button in the toolbar. Then, click on the colors that you want to select. Photoshop will then create a mask based on those colors.
3 Tips to get the best results
Tip #1:
In order to achieve crisp, clean lines, one must first ensure that the area of color to be erased is evenly and clearly delineated. Create a duplicate of your layer so you can use the Levels and hue/saturation tools to adjust the colors and contrast. The outcome will be a more refined pool of candidates. To finalize your selection, click on the active image layer.
Tip #2:
You can use the eraser to clear the background of a shape or logo so that it has uniform color and crisp edges. To erase a color, simply click on it and move the eraser in the desired direction. Strength, hardness, and size can all be modified to suit individual needs.
Tip #3:
The Hue/Saturation tool (CTRL+H) allows you to make a single color into another, or to desaturate (turn to black and white) all colors except one. By adjusting the saturation slider, you can alter the hue (color) of the selected tones (Reds, Greens, Yellows, Blues, etc.) or desaturate them entirely. Think of a photo of a yellow cab where the cab itself is colored, but the background is black and white. In addition to the desaturation and masking techniques discussed above, you can also use a combination of the two to achieve your desired effect.
Importance of knowing how to select the same color in Adobe Photoshop
Before using Photoshop to duplicate a color, you should think carefully about this. After all, how you pick the same color will determine the final look of your image.
Depending on your end goal, the Photoshop color selection tool you choose may also add extra work. Selecting a single color in Photoshop and then replacing it with another color requires the use of specialized tools. However, if all you’re doing is choosing instances of a particular hue in Photoshop to erase them from your image, you can accomplish this task much more quickly and efficiently with other tools.
Conclusion
Now you know different options for selecting all of one color in Photoshop which is a fairly simple task. The easiest way to do it is to use the color range tool. You can also use the Magic Wand tool or Quick Mask mode if you need more control over which colors are selected.
Hope this article helps!