PNG to ICO in Photoshop:
If you have a PNG image that you would like to convert to an ICO file in Photoshop, there are a few simple steps that you can take.
First, open the PNG image in Photoshop.
Next, select the “Image” menu option and select “Convert to ICO.”
PRO TIP: When converting PNG to ICO in Photoshop, it is important to note that the image quality may suffer due to the compression that is inherent in the ICO format. Additionally, transparency information may be lost in the conversion process.
This will open the “Convert to ICO” dialog box.
You will need to provide a few basic information about the PNG image, including the resolution of the image, the color mode, and the file format.
Once you have provided this information, the “Convert to ICO” dialog box will automatically generate the ICO file.
You can then save the ICO file to your computer.
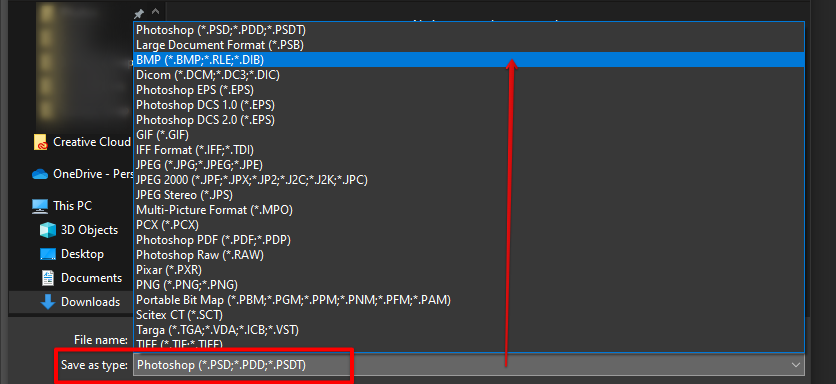
Alternatively, you can convert the PNG to ICO format through the Save As option. Simply go to File>Save As, and in the Save as type menu, select Bitmap or BMP for short.
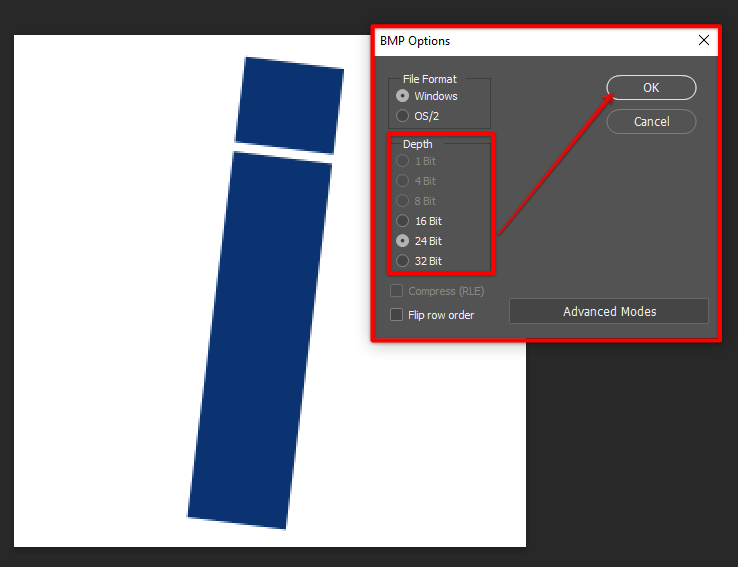
Next, select 24 Bit or 32 Bit in the BMP Options dialog box and click Ok.
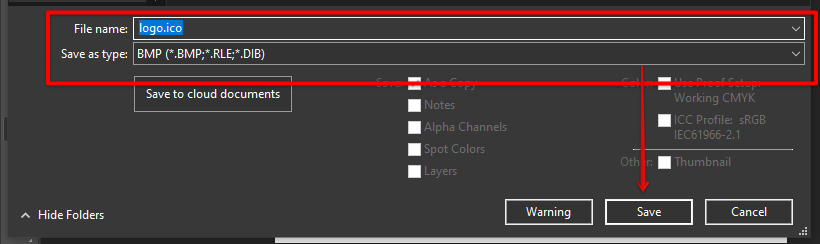
Then, in the file name, make sure it has an extension name of “.ico” before clicking Save.
Finally, check your File and see the differences between the PNG and ICO formats. Take note: The image quality may suffer due to the compression inherent in the ICO format.

10 Related Question Answers Found
When it comes to image file formats, there are a few that are universally accepted. JPEGs, for instance, can be opened by just about any image viewing software out there. On the other hand, there are some that are less popular and only work with specific programs.
An ICO file is a file used to store an icon, most commonly used on the Windows platform. ICO files contain one or more small images at multiple sizes and color depths, such that they may be scaled appropriately. ICO files usually contain 32-bit images and may also contain 8-bit images.
An ICO file is a vector graphic file that is used to create an interactive coin or token. It is a type of file that is used to create logos, icons, and other graphics for digital platforms. The ICO file can be created in Photoshop using various tools and techniques.
Yes, Photoshop can save ICO files. In order to do so, simply open the ICO file in Photoshop and then go to File > Save As. In the Save As dialog box, make sure to select the ICO file format from the drop-down menu and then click Save.
ICO is a file format used to store computer icons. ICO files can be created in a number of ways, including through the use of Photoshop. In order to create an ICO file in Photoshop, you will need to have access to the program’s “Save As” function.
ICO files are a type of image file that is commonly used to store icons on a computer. ICO files can be created by any image editor, such as Photoshop, and they can be converted to other image formats, such as JPG or PNG. Photoshop can open ICO files and convert them to other image formats.
When you download an ICO file, it usually comes in a ZIP format. You can open this ZIP file using any program that supports ZIP files, such as WinRAR or 7-Zip. Once you’ve extracted the ICO file from the ZIP file, you can open it in Photoshop by going to File > Open.
Yes, Photoshop supports ICO files. You can use Photoshop to open and edit ICO files. ICO files are usually used for website favicons or Windows icons.
If you want to save a .ico file in Photoshop, there are a few things you need to know. For starters, ICO files are currently not available in the file formats existing within Photoshop. If you’re planning to save an image or design as a .ico file, a plug-in is required.
Creating a .ICO file in Photoshop is relatively easy. First, open Photoshop and create a new document. You can use any size you want, but I suggest a width of 800 pixels and a height of 600 pixels.