When compared to other image editing and manipulation apps, Adobe Illustrator is in a league of its own. In contrast to Photoshop, the other mainstay of Adobe’s Creative Suite, Illustrator relies on vectors (lines and curves) to construct graphics. Therefore, erasing an area of an image is handled differently than it is in other editors.
You can change the geometry of your vectors by using the eraser and cutter tools in Adobe Illustrator. We will show you how to it is exactly done.
Read on!
How to erase a part of an image in Adobe Illustrator
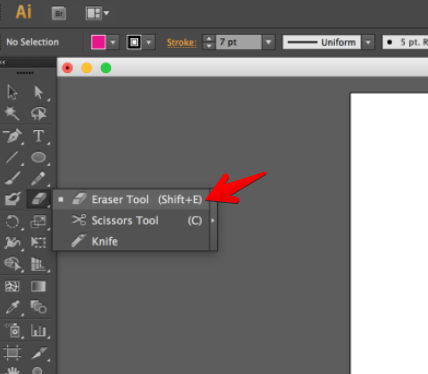
If you want to erase part of an image in Illustrator, you can use the Eraser tool. The Eraser tool has a few different settings that you can use to erase parts of the image.
The settings that you can use depend on the type of Eraser tool that you have selected.
The most common Eraser tool is the Pencil Eraser. The Pencil Eraser has two settings: Hard and Soft.
The Hard setting erases more quickly, while the Soft setting erases more gently.
If you have the Magic Wand tool selected, the Eraser tool has three settings: Hard, Soft, and Brush. The Hard setting erases more quickly, the Soft setting erases more gently, and the Brush setting erases with a brush-like effect.
To erase part of an image with the Eraser tool, first, select the Eraser tool. Then, select the type of Eraser tool that you want to use.
Next, click on the area that you want to erase. Finally, click on the Eraser tool to start erasing the area.
Have problems when erasing a part of a photo?
You’re in trouble if you choose the Eraser Tool with the intention of erasing something; then, upon hovering the mouse over the target object, a warning indicator appears.
The following are some potential causes of Adobe Illustrator’s erasing difficulties:
1. You’re attempting to delete content from a raster image, which is not possible.
Illustrator’s Eraser Tool cannot be used to remove the background from an image like Photoshop’s can. Raster pictures can’t be edited by erasing anything.
2. You failed to make a text outline.
This is presumably what you see when you utilize the Type Tool to add text without outlining it. It can’t be changed with the Eraser Tool since active text cannot be deleted in Illustrator.
3. The (vector) image wasn’t embedded.
Be sure to embed the image when using internet stock vectors in Illustrator if you download them. When a picture is used in a document that wasn’t made with Adobe Illustrator, it’s called an embedded image (files).
Illustrator’s bounding box features two crisscrossing lines when a file is imported. If you see a box like this one, it means the Eraser Tool is disabled.
4. The object is locked.
I’m going to presume you are aware that locked items can’t be changed in any way. Removing content follows the same principle. Any attempt to manipulate a locked item will result in failure.
5. You are attempting to modify a symbol, which cannot be done.
It seems that you can’t delete a symbol at all, not even Illustrator’s built-in ones. This is from Illustrator, and I just claimed you couldn’t directly modify images made in another program.
When I first tried to modify a symbol, I had the same concerns. A single step is all that’s needed to bring about the desired result.
Best practices when removing parts of an images (text, objects, people etc.)
First, let’s go through some photo editing rules of thumb for object removal before we get into the conclusion about the nitty-gritty of erasing something from an image.
Find the right picture.
Remove individuals from photographs more easily by leaving some blank space around the topic in the original photo. The subject or object’s size or the amount of space it takes up in the photo are some factors that can help.
Find the exact outline of the thing or person you want to get rid of.
If you accidentally pick too much space, use the eraser tool to get rid of it and try again. Using an editing app like Picsart, you can quickly remove the background using the Remove Bg tool or replace a portion of the image using the Clone tool.
If you’re going to remove something from a shot, make sure it still looks good.
If the act of taking it away will draw attention to itself, don’t do it. Inadvertently drawing attention to the region that was cropped out of a picture can defeat the aim of doing so.
Think about the moral implications before cropping images or deleting individuals from them.
Consider whether or not flaws in your portrait are distracting. Taking someone out of a photo or making other changes, would it be offensive? How does the removal of language affect the meaning of an image? When working on an edited image, keep this kind of ethical consideration in mind.
It never hurts to get a second opinion.
After finishing your post-production work on an image, have a second pair of eyes look at it. They probably won’t even realize that something is missing from the photo.
Conclusion
In Illustrator, erasing a section of an image is a simple matter of practicing with masks. It’s highly beneficial to learn how to use masks in a vector context, as they may be used for much more than simple erasure. Fortunately, Illustrator simplifies and streamlines this procedure more than any other vector program.
Please use the comment section below to ask questions or get clarification!