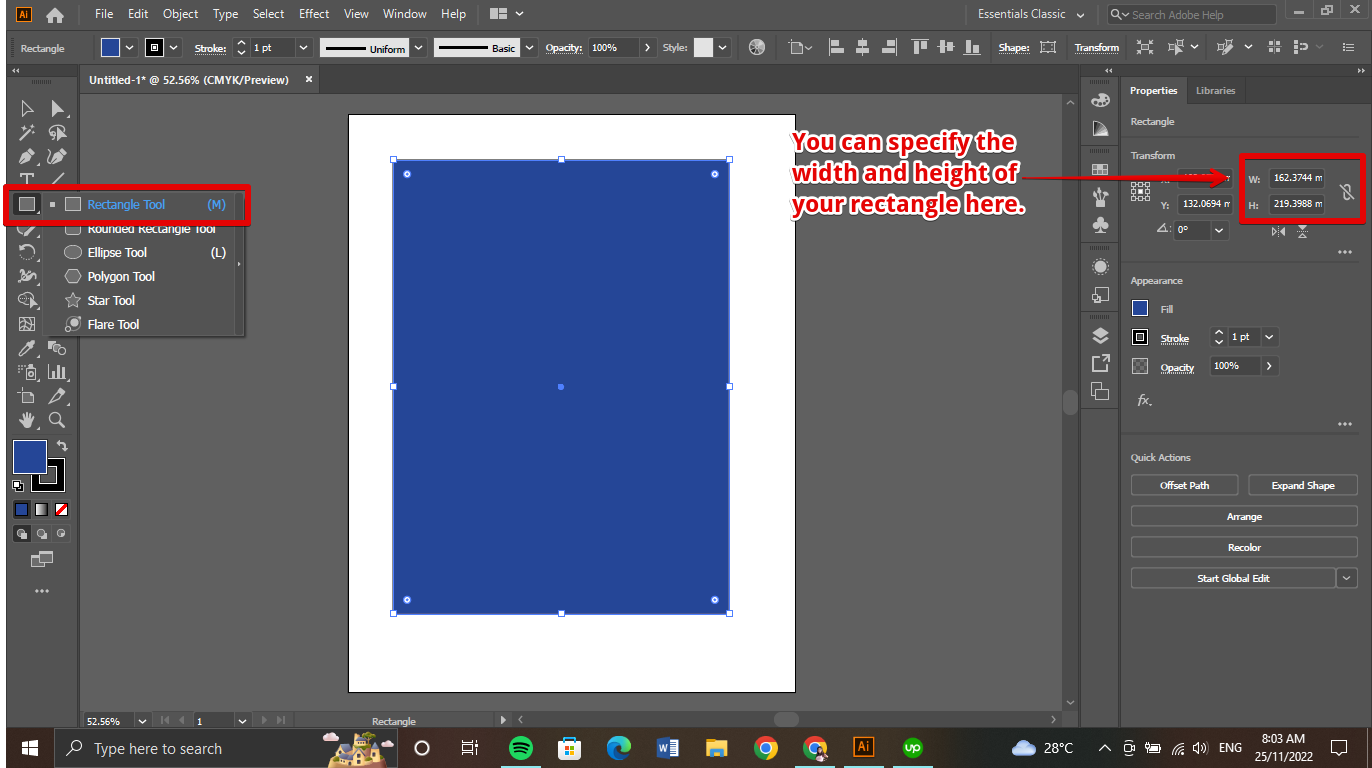
Illustrator is a great tool for creating grids, and there are a few different ways to do it. One way is to use the Rectangle Tool (M) and create a rectangle that is the same width and height as the grid you want to create. You can specify the width and height of your rectangle at the Transform quick access tool.
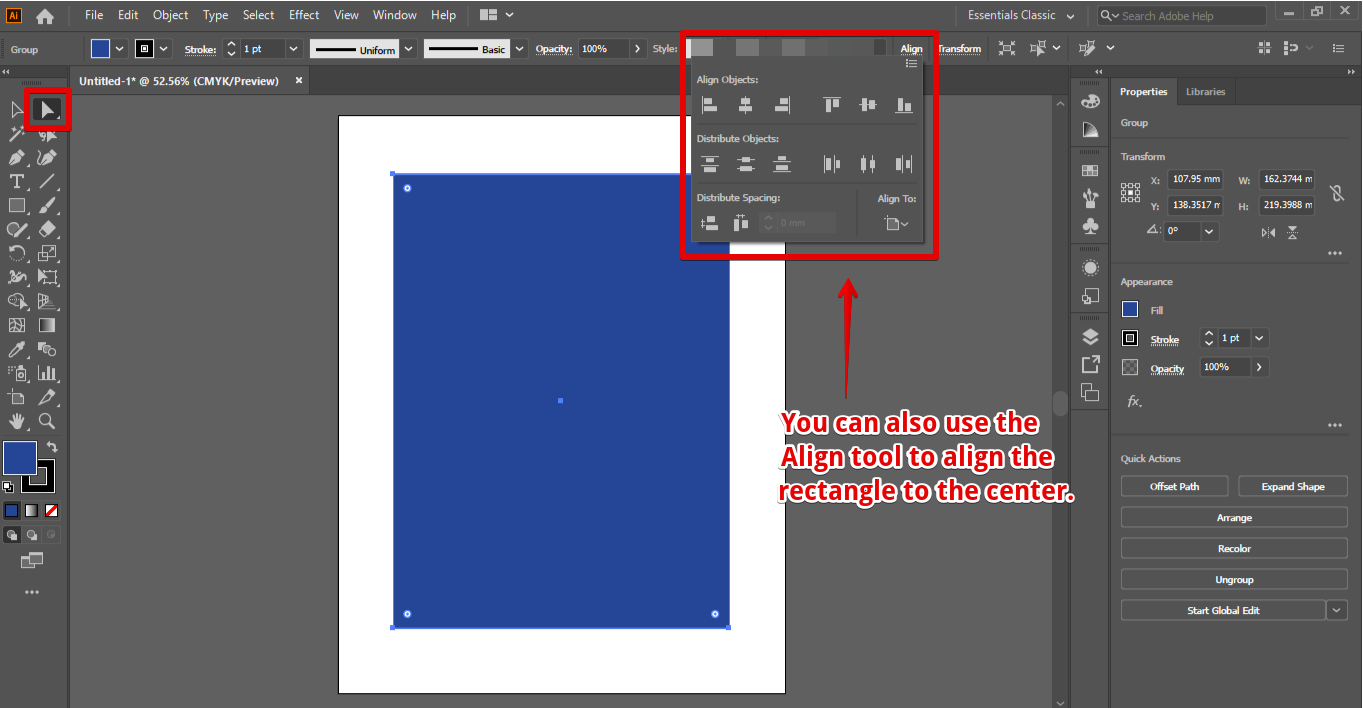
Then, click on the Anchor Point icon (A) in the Toolbar and drag the rectangle so that it is centered on the grid. Or use the Align tool to align the rectangle to the center.
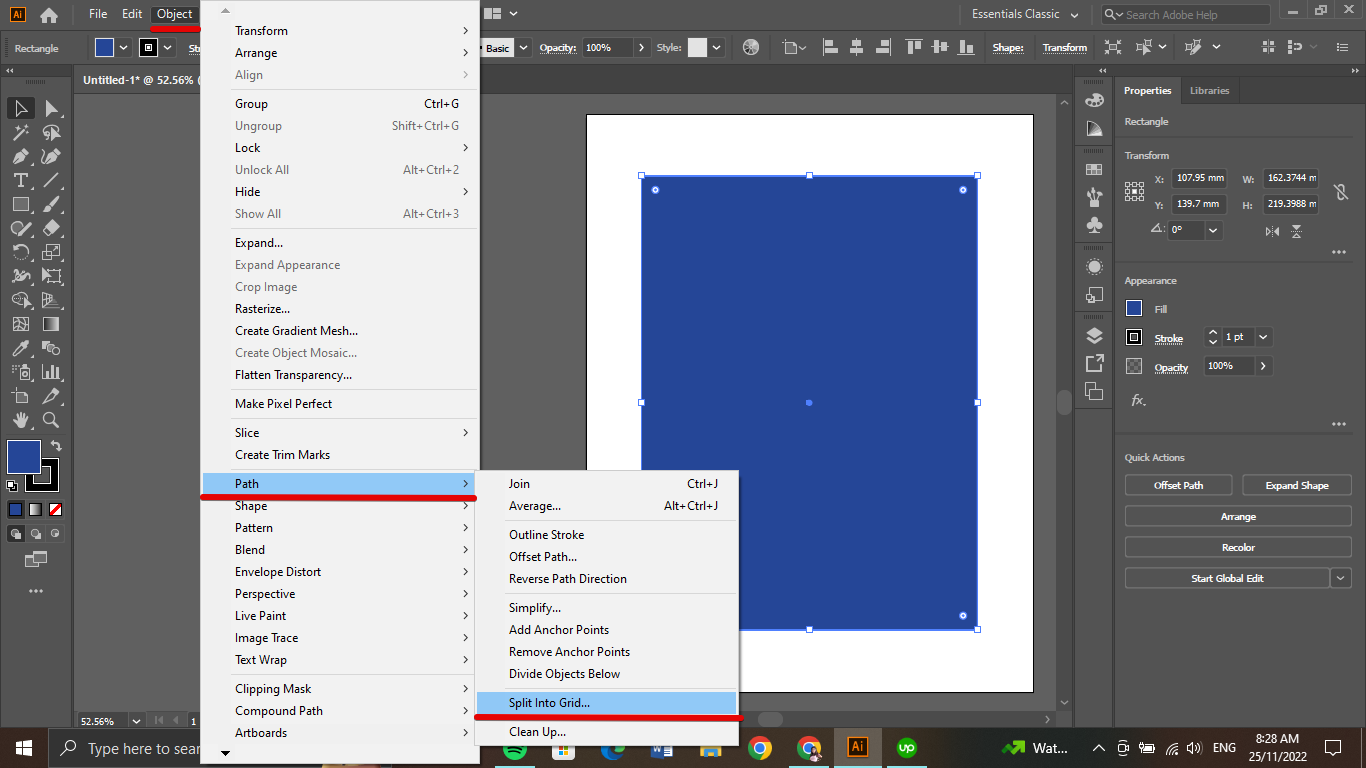
Another way to create a grid in Illustrator is to use the Grid command (G). Select the object you want to grid and click on the Grid button in the Control panel. Similarly, you can go to the Object in the top menu, search for Path and click the Split into Grid option.
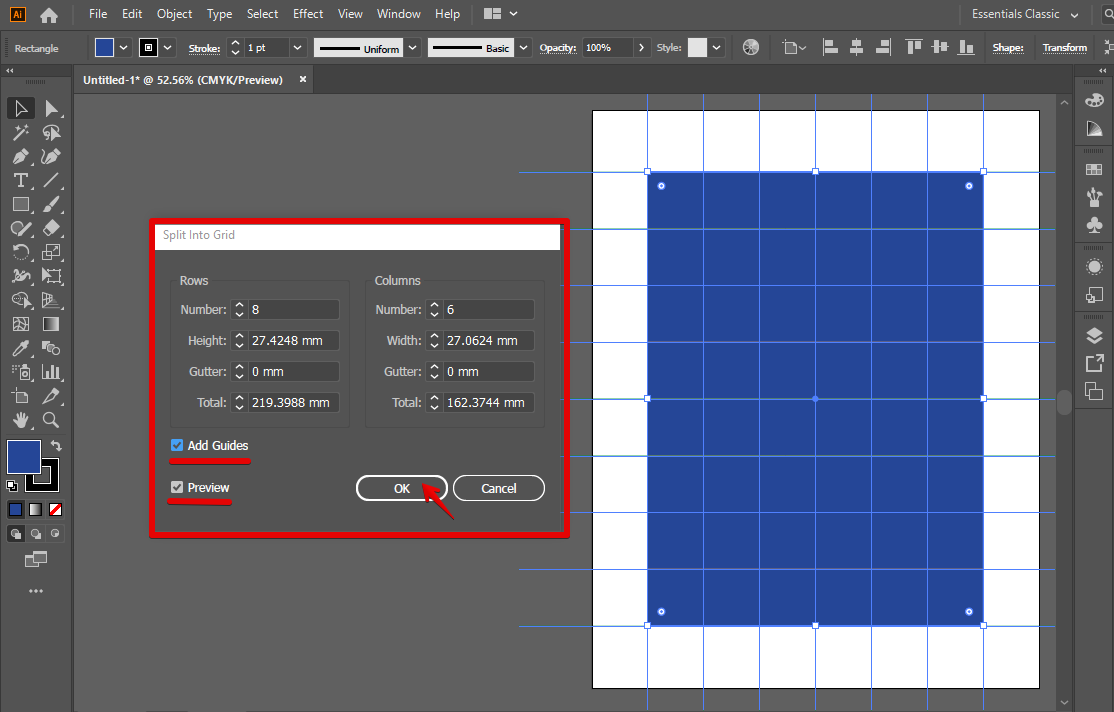
Next, specify the number of rows and columns in your grid. Moreover, you can also change the height and width of each grid cell and its gutter, if necessary.

Furthermore, you can tick the box to add guides and preview your grid before clicking Ok.
PRO TIP: When creating a grid in Illustrator, it is important to first create a new layer to work on. This will ensure that your grid lines do not interfere with other elements in your design. To create a new layer, go to the ‘Layer’ menu and select ‘New Layer.’ Then, use the ‘Line Segment Tool’ (located under the ‘Pencil Tool’) to draw horizontal and vertical lines across your workspace. To make your lines spaced evenly, hold down the ‘Shift’ key as you draw. Finally, use the ‘Select’ tool to select all of your lines, and go to ‘Edit > Copy.’ Now you can paste your grid onto any other layer in your document.
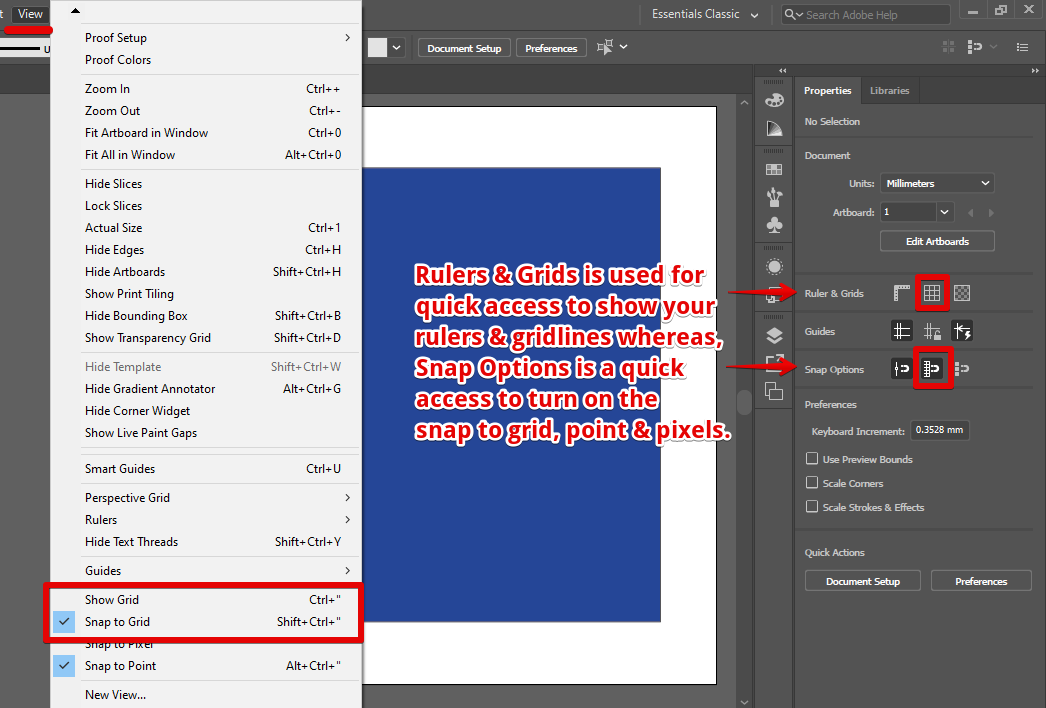
You can also use the Gridlines command (G) to create gridlines on the rectangle. Or go to the View menu and click the Show Grid option. You can also use the Snap to Grid command (S) to help keep the grid lines consistent. There are also quick access tools in the right panel such as the Ruler & Grids and Snap Options to instantly show or activate your gridlines, snap to grid, and point & pixels command.
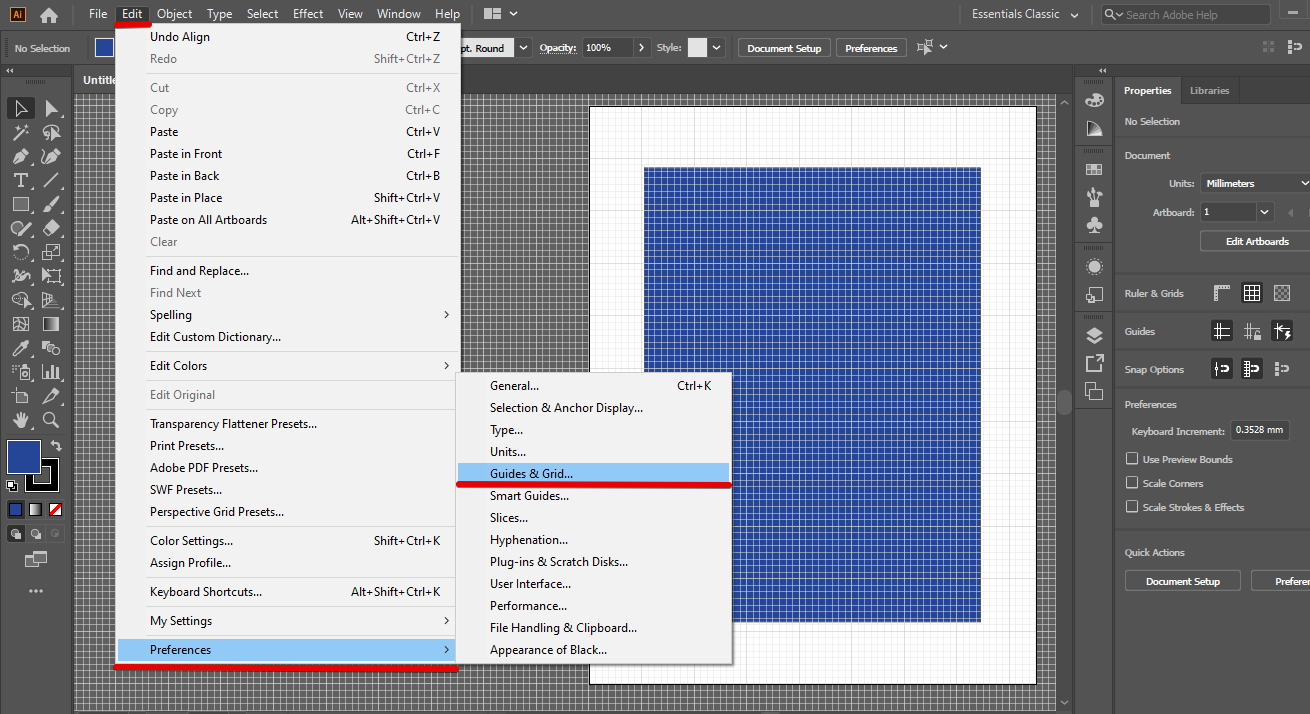
When creating a grid in Illustrator, it is important to keep in mind the resolution of your file. If the grid is too small, it will not be visible, and if the grid is too large, it will take up too much space. You can adjust the grid size by clicking on the Gridlines button and then clicking on the individual gridlines. Or go to the Edit menu, search for Preferences and click Guides & Grid.
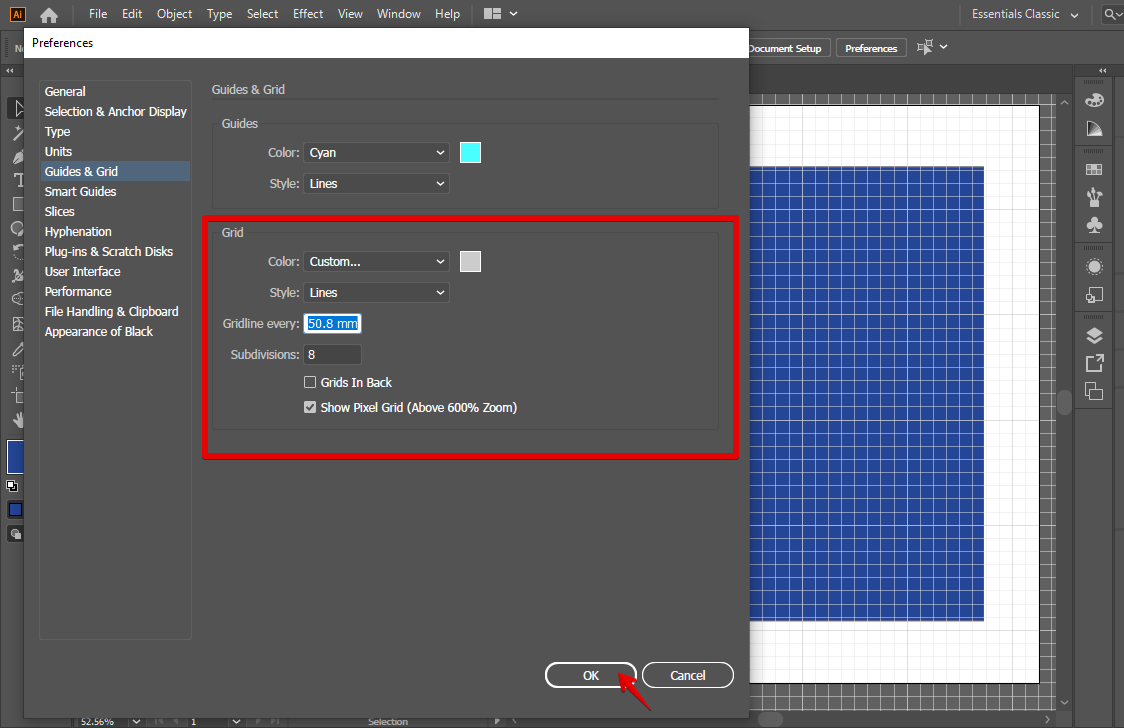
A dialog box will appear where you can adjust the size of each grid cell. You can change the resolution by clicking on the Scale button and selecting a higher number. Click Ok once you’re satisfied and notice how your grid changes.
9 Related Question Answers Found
What is a Grid in Illustrator? A grid is a graphical representation of how objects will be positioned on a page. It can be used to organize and control the layout of your artwork.
Creating a grid in Illustrator is fairly easy. To create a grid, start by selecting the object you want to grid, and then choose the Grid tool from the Tools panel. Illustrator will then display the Grid Settings dialog box, which you can use to specify the size and spacing of the grid.
Adding a Grid to an Illustrator File
Gridlines are used in Illustrator to help you align objects, and they’re easy to add. Follow these steps:
1. Choose Object > Guides > Grid.
2.
If you want to create a custom grid in Illustrator, you first need to create a grid template. To do this, open the Illustrator Grid Options dialog box by clicking on the Illustrator > Grid icon on the toolbar or by pressing Shift+G. Select the Grid Type option from the menu and select the desired grid type from the list.
Logos can be created in a variety of ways in Illustrator. One option is to use the Pathfinder tool to create a rough outline of the design, and then use the Object tool to add in specific elements. Another option is to use the Vector tools to create a vector-based design, and then use the Illustrator Fill and Stroke tools to add in specific colors and details.
An outline in Illustrator can be helpful in planning your artwork, and in keeping your artwork organized. Outlines can be created in a number of ways, but the most common way is to start with a base shape, and then add points and lines to create the outline. There are a number of tools and methods that you can use to create an outline in Illustrator, and the one that you use will depend on your specific needs. .
An elaborated article about how to make a calendar in Illustrator:
In this tutorial, we will show you how to make a simple calendar in Illustrator. The finished product should look like the image below.
1. First, start by creating a new document in Illustrator.
Creating a logo in Illustrator can be a fun and creative process. There are a few steps you can follow to get started. First, start by creating a new document in Illustrator.
An elaborated article about making patterns in Illustrator:
One of the great features of Illustrator is that you can create your own patterns. This can be done by drawing a shape and then selecting the Pattern Stamp tool from the toolbar. You can then choose the type of pattern you want to create, such as a grid, a checkerboard, or a diamond.